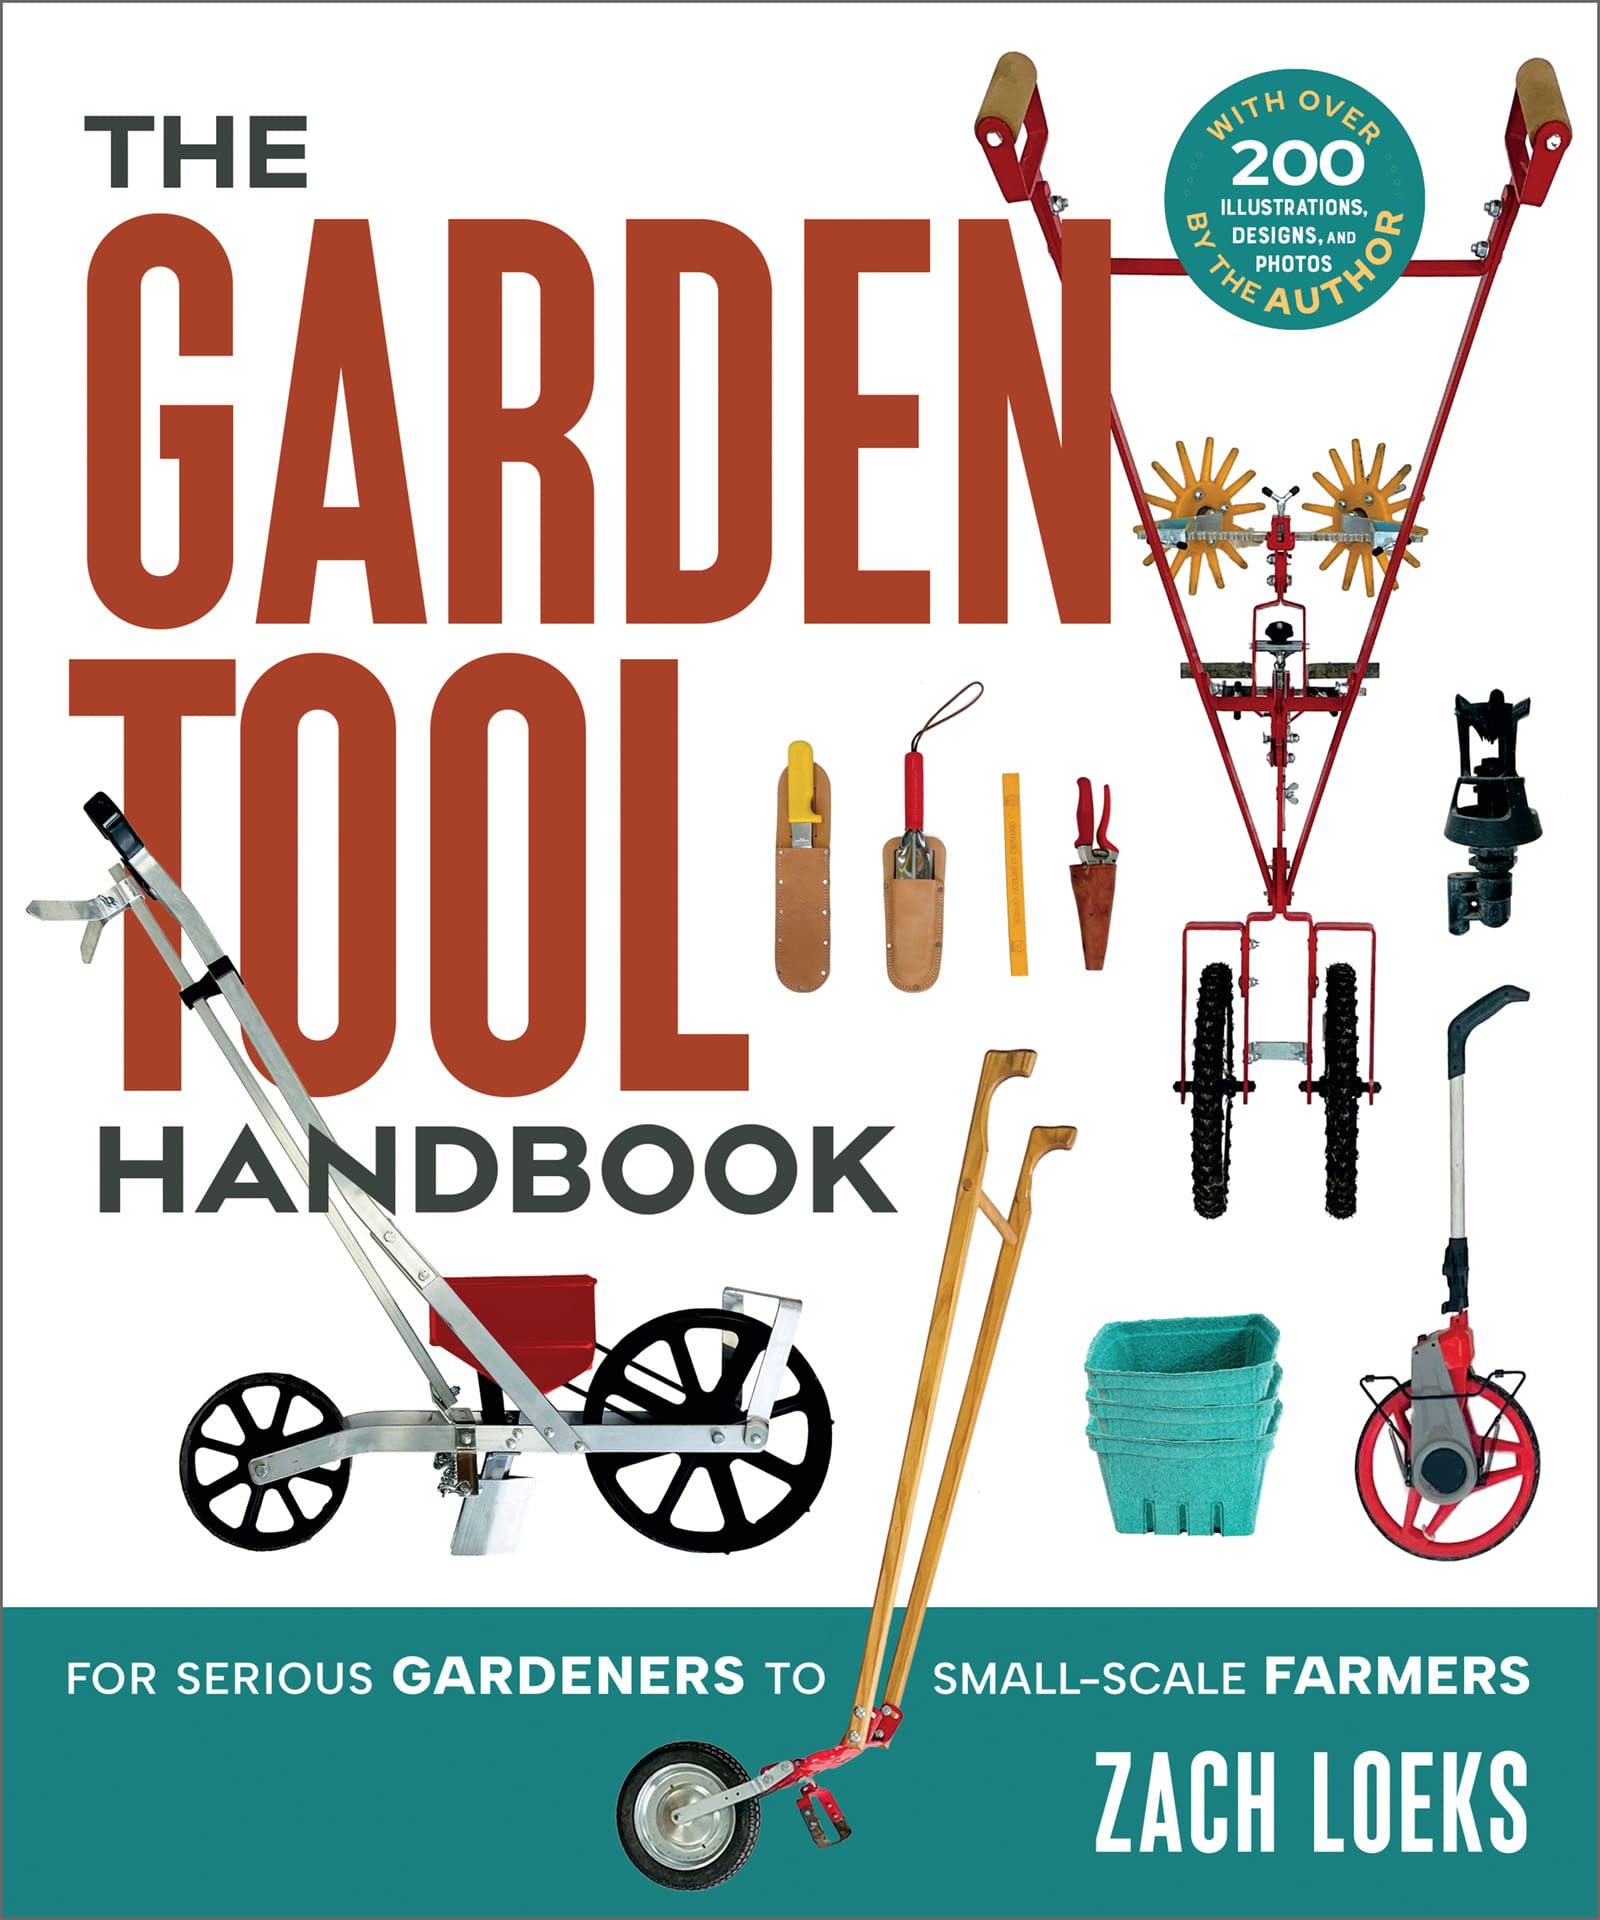
Book Review: The Garden Tool Handbook, by Zach Loeks
Zach Loeks , January 14, 2025, 240 pages
Book Review by Pam Dawling, Author of Sustainable Market Farming: Intensive Vegetable Production on a Few Acres, and The Year-Round Hoophouse: Polytunnels for All Seasons and All Climates
Another superbly practical book from Zach Loeks!
Hand tools can have ergonomic advantages for tackling repetitive tasks, bringing more comfort, enjoyment and productivity. Tools extend our human power, reach and capacity. The original tool was the human body, and there is an amusing picture of 4 humans lying on a white background. Each is holding a hand tool, an arm extension.
Good tools, well understood, make for a better life. Wisely chosen gardening tools help us deal with pests, weeds, diseases and bad weather. Read this book to learn which types of hoe are best in various situations, and which types are best in several situations! (Don’t just buy any hoe! Don’t buy twenty hoes either!)
Zach distinguishes the different scale phases of vegetable production. Are you “starting up, scaling up, or pro-ing up”? There are tools for every scale, from beginner to homesteader to professional. Newbies aiming for an efficient home garden might not buy the same tools as a newbie intending to go professional. This book helps everyone who might feel overwhelmed or get confused by multiple options. It is an aid with mental health as well as the practicalities of being a grower!
By breaking the season into 16 stages and showing which tools help us be most productive at each stage, Zach helps us make wise choices suiting the operation and scale. He advises identifying and strengthening the weak links in your production stages so that each task has a productive tool, technique and timing, improving efficiency, ergonomics as well as productivity. By understanding the garden task cycle, you can prevent wasted labor and design a smooth workflow.
The first third of the book is about tools; the rest is about planning, designing and creating your garden, choosing good tools for all scenarios. Farm profiles illustrate creative ways various growers have tackled common tasks.
Zach grew up on a permaculture homestead, but you don’t have to be a “Permie” to appreciate this book. You can still admire Zach for having hand-planted 100,000 saplings to restore native woodland, riparian buffers and upland shelter belts. He has also grown over 1000,000 heirloom garlic bulbs each year, designing five DIY garlic dibblers to improve accuracy, uniformity and efficiency in garlic planting.
Well-lit photos show variations on each type of tool, and you will likely meet some new to you. I’m enamored of the manual tine weeder and the home-made leek dibbler! Complex tools have photos with numbered parts and clear instructions.
Zach provides photos and information on using a coppiced woodland to grow and harvest tool handles. The section on tool architecture provides understanding of the function of handles, collars, fasteners, grips and joints. There are examples of traditional farming tools. Understanding historical tools helps us appreciate modern ones, distinguishing what is useful from what is decorative at best. Even if you never make a tool by hand, you will at some point want to repair your favorites.
Then comes consideration of tool types: long-handle, short-handle, medium-handle, wheel tools, multi-functional tools, attachment tool systems (usually a long-handled tool used with several different heads), multi-row tools for larger plantings, power tools and stationary tools like root washers.
Next follows a discussion on the nuances of tool design, to help you fulfil the important functions. There’s a photo of nine types of hoe, and one of nine types of rake. The shovels and spades photo includes 13 options, some of which I had never seen or considered. There are 20 short-handled cultivating tools, over a dozen task-specific knives, 17 varieties of trowel, including one in both left-handed and right-handed versions, one intended for archeology, and one with an included bottle opener. There are 21 forks, including broadforks, digging forks, pitch forks for hay and straw, a specialized ground elder fork and a potato digging fork.
The tool section lets you see and consider the options before shopping or making your own tools. If you are making your own, it is vital to understand what purpose it will have. Don’t assume your redesign will be an improvement on a traditional used-and-refined-over-centuries tool. There is a section on simple cost-effective DIY projects, with several photos, including one on building a rolling row marker from scratch, although it focuses on making best-height handles and says little about the metal roller part. Zach has a 1-2-3 row system for his beds, so you can use the same roller and then plant the rows you want, ignoring the other marks. No adjusting of the row marker!
The next section looks at the garden operation cycle and stresses the importance of knowing your goal and the steps to get there. Identify success in terms of yield, quality and timing. Take the logical seasonal steps: study your soil, plan your crops, order enough seed of suitable varieties, and schedule the work. Achieving progress enables gardeners to scale up when they are ready and have mastery of tools, techniques and timing.
The garden cycle is divided by Zach into 16 production stages: Site Analysis and Sampling; Garden Design and Crop Planning; Garden Starts; Primary Land preparation; Plot and Permabed Forming; Fine Seedbed Preparation; Seeding and Planting; Irrigation; Garden Crop Maintenance; Crop Weeding; Garden Harvesting; Season Extension; Post-Harvest Handling and Curing; Cold Storage; Marketing; Cleanup and Maintenance. Having a systematic approach can help growers (especially new ones) stay on track, be less stressed, and get the best possible results.
Next up are tool guilds. Guild is a permaculture term for an assembly of three or more units that work together to achieve something bigger. A tool guild is a selection of tools used together for a particular task. A shovel, grub hoe and rake can be used together to prepare beds.
The basic divisions of scale are Start-up, Scale-up and Pro-up. Your desired final steady state is the goal you work towards. Start-up gardeners will focus on tools to prepare land better. When scaling-up, seeding, weeding and watering will need to become more efficient. Pro-up growers will likely need to focus on harvest, post-harvest and storage. Look at which production tasks are slow, or don’t produce consistent good results. These are your weak links. Look for all the contributing factors. You may need to scale up several production stages in unison to address a problem. Don’t rush out to buy new tools to solve problems.
Part Two of the book covers site analysis – your starting point – topography, current plants covering the soil, climate, hardiness zones, elevations, sunlight coverage and soil types.
The next chapter addresses garden design and crop planning: notebooks, journals, spreadsheets, databases, photos, sketches, phone, laptop, tablet, field notes, financial records, task lists, crop and variety choices, seed orders, crop-specific research, right down to the pencils!
Make yourself an annual garden schedule, perhaps using a spreadsheet. Zach refers to Crop Planning for Organic Vegetable Growers, by Dan Brisebois and Fred Thériault, as a great resource. Spreadsheets can be used to create garden layout maps too.
The third chapter in this section is all about garden starts (seedlings for transplanting). Depending on scale and stage, starts may be grown in open flats or cells, with humidity domes, germination chambers or insulated climate-controlled rooms. Or starts may be bought, if suitable ones are available to you.
For expensive seed, especially long-season crops, potting up from open flats is recommended. Fast-growing crops are often seeded directly in the ground, or in cell-trays. Germinated seedlings are moved into a greenhouse, with more variable temperatures and humidity. After a period of growth, the plants are large enough and hardened off so that transplanting outdoors will not be too risky.
Chapter 4 covers primary land preparation. Tarps or weed barrier (landscape fabric) can be used to kill existing plant matter in preparation for planting. It can take 2-6 months. Zach calls this task “frying.” Solarization is a similar practice using clear plastic with the main goal of killing pests and disease in the top 4” (10 cm) of soil. After frying, the soil can be worked up with a shovel, spade, digging fork or, particularly for areas bigger than 1 acre/0.4 hectare, a two-wheeled tractor.
This leads directly to a section on two-wheeled tractors (aka walk-behind tractors) and referral to Zach’s book The Two-Wheeled Tractor. Those breaking ground (a popular term for primary tillage) with hand tools will do well to study the section on hoe types. A heavy grub hoe is probably what you need, unless you have very light soil.
After the primary tillage including the incorporation of compost, comes the secondary tillage to prepare a fine seedbed. This may involve a choice of picks, heavy hoes and cultivators. Work down to lighter hoes and cultivators, as the size of the soil particles gets smaller.
Then comes bed-forming, or as the Permaculturists call them, Permabeds. These are beds that only need one initial primary tillage, followed by annual reshaping. Permaplots are clusters of three Permabeds. Those wanting to know more about the Permaculture side can read Zach’s book, The Permaculture Market Garden. It’s equally possible to get good value from this book if you are a grower with small interest in Permaculture. (I confess my attention wandered when I got to the Permabed Architecture section.)
Some form of raking will be needed before planting, to leave the bed loose but firm on top and deeply worked beneath. The particle size needed for the top layer of soil depends on the size of the seeds being planted. Planted seeds must have good seed-to-soil contact: clods, crop debris and large air spaces will deter good growth.
Periods of pre-weeding and mulching before transplanting will help grow good crops. After preparing and watering the bed, weeds germinate and are killed by shallow hoeing or by flaming. If you prepare a bed, wait a few days, then sow your crop, without any pre-weeding, weeds will germinate before your crops, and you will be in a losing situation. Alternatively, the bed is tarped and the germinating weeds under the tarp die once the light reaching the seedlings is insufficient. With an accurate tine weeder, and an accurate worker, beds of newly germinated crops can be successfully weeded in the first week after the crop germinates. This chapter is where I found the manual tine weeder I mentioned near the beginning.
There is a sidebar on Succession Bed Preparation for replanting, known by some growers as “flipping” a bed. Not to be confused with Succession Crop Planting which is scheduling a series of plantings of a crop to provide continuous supplies of it.
Chapter 7 is Seeding and Planting. Zach points out that by marking equidistant parallel planting rows, you can quickly and efficiently hoe the spaces later. The cheapest marking tools (other than a plastic ruler) leave a grid. You may prefer an offset planting pattern to get the plants equally spaced. You can do this by sizing your rectangular grid such that you only plant in every other marked spot along the rows.
Some tools which the author recommends include the Jang seeder, the Paperpot Planter, airpruned cell trays (like Winstrip), a transplant caddy, a rolling dibbler, the Earthway push seeder for start-up gardens, and a spinner-seeder for broadcasting cover crops.
Chapter 8 is on the important topic of irrigation, (“water management is one of the first weak links to emerge” as Zach says). This includes water storage, pumps, manifolds, distribution systems and water conservation. There is an irrigation sidebar “When to Sprinkle and When to Use Drip.” Sprinklers are best for broadcast seeds and closely-spaced rows of direct-seeded crops.
Chapter 9 is garden crop maintenance, including tasks such as trellising, where I learned the option of threading a top bar through CPVC T’s sitting on top of T-posts.
Soil fertility and pest management are discussed in concert, as both can involve the same tools, like sprayers, as shown in the photos. There is a helpful sidebar explaining that expensive pesticides are rarely cost-effective compared to improved cultural practices and barriers such as rowcover or netting. It’s also important to monitor crops and determine if the pest problem exceeds the Action Level. Many crops can survive 30% defoliation without loss of yield. Zach’s first line of pest management after barriers and providing healthy growing conditions, is a set of homemade sprays and soil drenches. He uses purchased beneficial organisms when needed.
Cover crops can include finished vegetable crops. Equipment for incorporating cover crops into the soil includes mowers, board crimpers or concrete settling rollers to flatten the crops, and tarps to kill them.
The task of weeding includes path, shoulder, between-row and in-row weeding of each bed. Straight parallel rows make for faster hoeing. There are tips such as making two passes along each row, hugging the crop as close as comfortable on one side and then the other. Tools for “blind weeding” such as weeding rakes and tine weeders are pulled across the bed, lifting the weeds but not disturbing the crop. Do this twice a week, with 2 or 3 passes down the bed, to catch the “white thread stage” weeds. It does not work for weeds that have more than the cotyledons open. Fast maturing crops (up to 35 days to maturity) will need one or two weeding visits; slower maturing crops will need 3-6 visits during their time.
Another option is a double-wheel hoe with finger weeders. The crop must be larger than the weeds for this method to be effective. Other tools include various sweeps, bio-discs, furrowers, torsion weeders and tine harrows. The book has good drawings to help you decide if these tools will work for your system.
Mulching, including weed barrier fabrics, will suppress weeds. Natural organic materials can be grown on your farm and will provide organic matter for the soil as they decompose. Synthetic roll materials can be faster to apply, and landscape fabric can have holes burned into it, and be rolled up when the crop is finished and reused for many years. Zach recommends “zipper beds” where landscape fabric is spread closely either side of the crop. No holes are made in the fabric.
Season extension needs specialized equipment: rowcover, shadecloth, hoops, something to hold down the edges of the rowcover, and perhaps to hold it to the hoops.
Carts, wagons, dollies and pallet jacks can all be useful for harvest, depending on your scale. There are photos of Vermont style carts assembled with mesh floors, making them longer lasting (it’s usually the floor of carts that rots our first). Harvesting requires containers, knives and other cutting tools. There are photos showing options of tubs and crates and consumable inputs (the right size rubber band will save frustration), and purpose-built DIY tools.
Post-harvest handling may involve a washing station, a barrel washer, a salad spinner and certainly some waterproof clothing! Curing may require space to hang crops or spread them on racks. Fans are useful to dry washed crops as well as help others cure. Don’t forget dust masks if working with dusty crops, like garlic.
Cold storage can mean a traditional in-ground root cellar, or an insulated building using a CoolBot system. Zach has an award-winning icehouse root-cellar. He uses plastic totes to make giant ice-cubes. He fills the “cubes” with water from his irrigation system in January, freezes them outdoors, then uses them in his cellar to maintain a temperature of 32-39F (0-4C) year-round. The ice lasts till October or later in his zone 4b climate in Cobden, Ontario. People in warmer climates would do better with a CoolBot.
Marketing may be a farmers market, online sales, a CSA, or feeding your household. There’s a helpful list of all the gear you need to take to market, including tools like flashlights and scissors, and a range of comfortable clothes.
The last section covers cleanup and maintenance, from field cleanup, onto workspaces, tools, equipment and supplies. Crop residues are removed from the beds (or turned under), empty beds are cover-cropped for the winter or tarped for early spring use. Some growers shift all the crop residues into the paths, flail mow to chop them into small pieces, and every few years, move the material up onto the beds.
Tools for cleanup can include brush-hooks, billhooks, loppers, hatchets, snips and pruners, to make use of woody crop residues. And then there are specialized tools you just might need: rolling nut collectors, curved shovels for extricating nursery perennials to pot for sale, augurs for making stake holes, landscaping and beekeeping tools, first aid supplies, hats, gloves, and a shop vac.
And you’ll need tools to care for the other tools! Scrapers, wire brushes, steel wool, sharpeners, files, a peening hammer for scythe blades, oil for moving parts, linseed oil for wood handles. Be sure to dry the rags out safely spread outdoors where the generated heat can dissipate, and the rags will not self-combust. Some people soak oily rags in water before drying them out.
You’ll need a storage system for small parts, a hanging system for long tools, perhaps a tool shed very near your garden.
Resources at the back of the book include a two-page list of tool companies and suppliers, and a decent length index.
Here’s a link to a short author video introducing the book: https://newsociety.com/video/the-garden-tool-handbook-book-introduction-158/
Here’s an excerpt from New Society: https://newsociety.com/2025/01/17/understanding-the-garden-operation-cycle/